
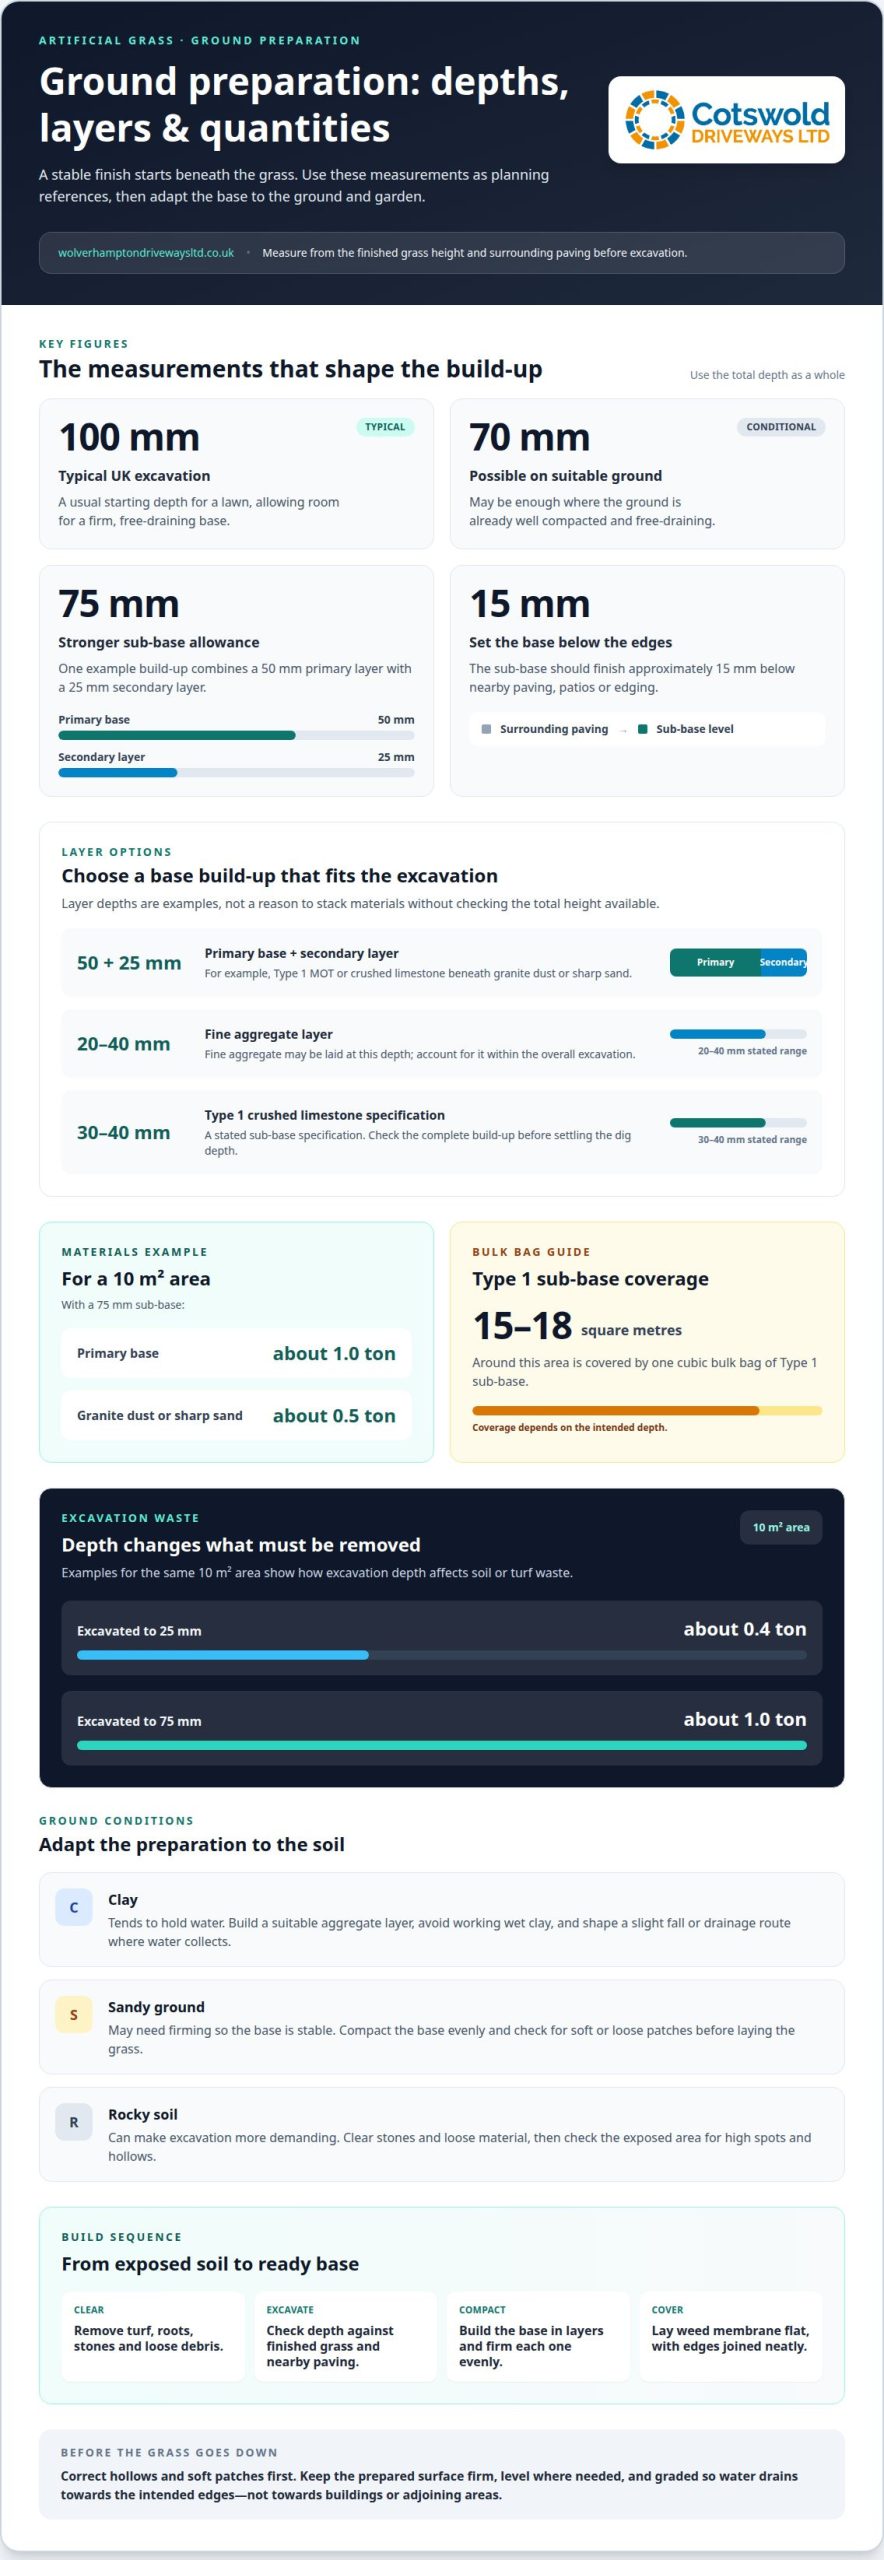
The finish depends on what sits beneath the grass. For a typical UK installation, remove the existing turf and excavate to around 100 mm; the exact depth depends on the ground and the space needed for a stable, free-draining base. Knowing how to prepare ground for artificial grass means allowing for the soil beneath, not just the lawn you can see.
It’s easy to assume that once the old turf is out, the hard work is done. But clay can hold water, sandy ground may need firming, and rocky soil can make excavation more demanding. Poor preparation can leave the finished surface uneven or draining badly.
This guide explains how deep to dig, how to clear turf and topsoil, and how to build a stable base. You’ll also learn how to adapt the preparation for clay, sandy or rocky ground, so you can plan the work around your garden’s conditions.
Key Takeaways
- Set the excavation to leave room for a firm base, and keep its finished height just below surrounding paving or edging.
- Choose and compact the base materials to suit the garden, rather than laying artificial grass directly on topsoil.
- Shape the prepared surface to encourage water to drain, especially where the garden tends to hold water.
- Adjust your approach for clay, sandy or rocky ground, as each can affect drainage, stability and the effort needed to prepare the area.
How deep should you dig for artificial grass?
For a typical UK lawn, excavate around 100 mm; well-compacted, free-draining ground may need 70 mm. Prepare a spade or turf cutter, wheelbarrow, rake, plate compactor, Type 1 MOT or crushed limestone, surface aggregate and weed membrane.
-
Build and compact the sub-base in layers
Add a primary base such as Type 1 MOT, crushed limestone, hardcore or crusher run. Spread and compact it in layers so the surface firms evenly, rather than trying to compact one deep loose layer. A 75 mm sub-base can include a 50 mm primary layer and a 25 mm secondary layer—a layered approach recommended by synthetic surface specialists like INSTATNT TURF – Synthetic Lawn & Sports – West Melbourne to ensure durability under regular use. Keep the finished base level and firm, without soft patches.
-
Plan the sub-base and surface layer thickness
Allow around 75 mm for a stronger sub-base, then choose the surface layer to suit the build-up. One example uses 50 mm of primary base and 25 mm of granite dust or sharp sand; fine aggregate may also be laid in a 20-40 mm layer. Type 1 crushed limestone sub-base specifications can use 30-40 mm, so avoid stacking layer depths without accounting for the total excavation.
- Estimate materials from the area and intended depth. A 10 m² example with a 75 mm sub-base uses about 1.0 ton of primary base and 0.5 ton of granite dust or sharp sand. One cubic bulk bag of Type 1 sub-base covers around 15-18 square metres. Excavation waste also adds up: a 10 m² area excavated to 75 mm can produce about 1.0 ton of soil or turf waste.
- Lay weed membrane flat over the prepared base before rolling out the grass. Smooth out folds, bring adjoining edges together, and trim the membrane neatly to fit. It helps prevent weeds and other plants growing up from beneath the artificial grass.
Excavating existing turf and topsoil
Clear the whole lawn area before excavation, including turf, roots and loose debris. Knowing how to prepare ground for artificial grass starts with removing organic material, not covering it with the new base.
-
Clear and excavate the area
Remove existing turf across the whole footprint, including narrow strips beside paving and garden edging. Lift out roots, stones and loose organic matter, which can leave the surface uneven if buried. Excavate the topsoil rather than hiding it beneath the new base. Keep the cleared area visible enough to identify hollows and high spots before adding the layers.
-
Set excavation depth and finished height
Mark the intended finished grass height against adjacent paving before digging. Excavation is typically 75 mm below finished paving level, allowing the base and grass to finish neatly alongside it. The sub-base should finish approximately 15 mm below surrounding paving, patios or edging—a standard benchmark also recommended by outdoor professionals like J Brewer Surfacing & Landscaping when blending lawns with hard surfaces. Measure at several points, since one depth reading can miss a sloping or uneven boundary.
- Work from one edge across the lawn, checking the depth as you go. A spade suits smaller areas, while a turf cutter can help lift established turf over a larger area. Run a straight edge across the excavated ground to spot raised sections. Remove them carefully instead of filling low areas with loose topsoil, which may settle unevenly. This is important when preparing an uneven lawn for artificial grass.
- Keep excavated soil separate from reusable turf and other garden waste. For example, a 10 m² area excavated to 25 mm can produce about 0.4 ton of grass or soil waste. A 75 mm excavation across the same area can produce about 1.0 ton. These examples show why excavation depth and area affect waste removal.
- Check the entire excavated area against your marked levels. Take care at door thresholds, paving edges and fixed garden features, where even a small height difference can affect the join. Remove any remaining soft patches and loose topsoil before building the base.
Preparing soil for drainage and stability
Inspect the exposed ground before laying the base. Its shape and drainage will guide how you prepare the surface.
-
Assess and improve drainage
Look for waterlogged patches, standing water or areas that remain soft after rain. These indicate where water is slow to drain. Remove loose debris, then create a firm, even surface before adding the base. Don’t cover a hollow with loose soil, which can settle and leave the grass uneven. Note the direction water naturally flows through the garden.
-
Grade the ground for drainage
Shape the base with a slight fall towards the edges, encouraging water to drain away instead of collecting in the middle. Use a straight edge to find dips and raised areas as you work. Keep the gradient consistent and avoid creating a low point beside paving or edging. A flat or unevenly graded base can leave water sitting beneath the grass.
-
Check planning and drainage requirements
Before changing ground levels, establish where surface water will flow and whether the work could affect existing drainage or neighbouring land. Planning and drainage considerations depend on the property and proposed changes, so one approach won’t suit every garden. Don’t direct run-off towards buildings or adjoining areas. Clear drainage routes before covering the ground with a new base.
-
Address drainage on clay soil or slopes
Clay tends to hold water, so excavate as needed and build a suitable aggregate layer. Avoid working wet clay, as this can compact it further. On a slope, follow the natural fall while creating a controlled route for water towards the edges. Where water collects, consider a slight gradient or drainage channel rather than leaving a flat, water-trapping section.
- Prevent common problems by compacting each layer evenly and checking for hollows before laying the grass. A loose, uneven or poorly graded base can contribute to sinking, wrinkles or standing water. Don’t cover soft patches with the surface layer. Correct them first, then check that the prepared area is firm and drains towards the intended edges.
Preparation for clay, sandy and rocky ground
- Start by identifying the soil type and any places where water collects. To work out how to prepare ground for artificial grass, note whether the exposed soil feels sticky, loose or difficult to dig. These signs help you decide what the base needs before installation.
- Clay holds water, so prepare a suitable aggregate layer and a route for run-off. Avoid working it when wet, as it can compact further. When preparing ground for artificial grass on clay, address drainage before laying the finished surface.
- On sandy ground, check whether the exposed soil shifts underfoot. A stable, compacted base helps limit movement beneath the grass. Spread the fine surface layer evenly and compact it before laying the turf. One cubic bulk bag of sharp sand covers around 20-25 square metres, depending on the finished layer.
- On rocky ground, remove large rocks and debris before building the base. Rake the area to reveal uneven spots, then prepare them so the surface is consistent. Don’t leave sharp protrusions beneath the grass. Check the whole area, including the edges, before laying the turf. Artificial grass shouldn’t go directly on topsoil; it needs a suitable underlay and sub-base.
- Concrete can provide a stable base, according to the National Library of Medicine, but still needs suitable drainage. Decking must also be stable, with preparation that avoids trapped water or an uneven finish. If you’d like help planning an installation suited to your garden’s ground conditions, contact the team about artificial grass.
Wolverhampton Driveways: Artificial Grass
Wolverhampton Driveways Ltd installs artificial grass for homeowners who want a finished lawn without managing every stage themselves. This can be useful for gardens with awkward levels, water-retaining clay, loose sandy soil or rocky areas that need careful preparation.
Every site needs excavation and a stable base suited to its ground conditions. If you’d prefer the installation handled for you, Wolverhampton Driveways Ltd can help with artificial grass. Get in touch to discuss your garden and the work you have in mind.
Plan your next step with confidence
Start by thinking about how you want the garden to work day to day. Consider where you need a clear route, a place to sit or a softer area for family use. These priorities can shape the layout before ground preparation begins, helping the finished space feel planned rather than simply covered.
Knowing how to prepare ground for artificial grass gives you a clearer basis for planning, but changing levels or working around awkward boundaries can make the job more involved. Wolverhampton Driveways Ltd also installs Tarmac Driveways, Block Paving and Resin Bound Driveways, so you can consider the wider outdoor layout alongside the lawn.
If you’re ready to discuss the garden and the work you have in mind, contact Wolverhampton Driveways. A clear plan is a practical first step towards an outdoor space that suits your home.
Frequently Asked Questions
How do you remove existing turf and vegetation before laying artificial grass?
Cut the lawn into manageable strips, then lift the turf with a spade or turf cutter. Remove roots, weeds and other vegetation instead of burying them beneath the new surface. Clear loose debris from the exposed area and separate soil from green waste as you work. Around borders and garden features, use hand tools to avoid disturbing edging or nearby plants.
How deep should you excavate for artificial grass in a garden?
For a typical UK garden, excavate around 100 mm, adjusting the depth to the soil and the layers planned above it. Measure from the intended finished level, not just from the current lawn surface. This helps make room for the base and grass without leaving the new surface proud of adjacent paving. Firm, free-draining ground may need less excavation.
What sub-base is best for artificial grass: MOT Type 1, crushed stone or something else?
MOT Type 1 or crushed limestone are practical primary-base options for a firm surface. Other aggregate, such as hardcore or crusher run, may also form the primary layer. The right choice depends on the ground and the required build-up. Use a suitable fine surface layer above the coarse aggregate, then compact each layer evenly before laying the grass.
How do you level and compact the ground before installing artificial grass?
Rake the prepared aggregate across the area, then use a straight edge to find dips and high spots. Add or remove material until the surface is even, with a slight fall towards the edges for drainage. Compact the base in layers rather than leaving one deep, loose layer. Check the edges and centre again before laying the grass.