
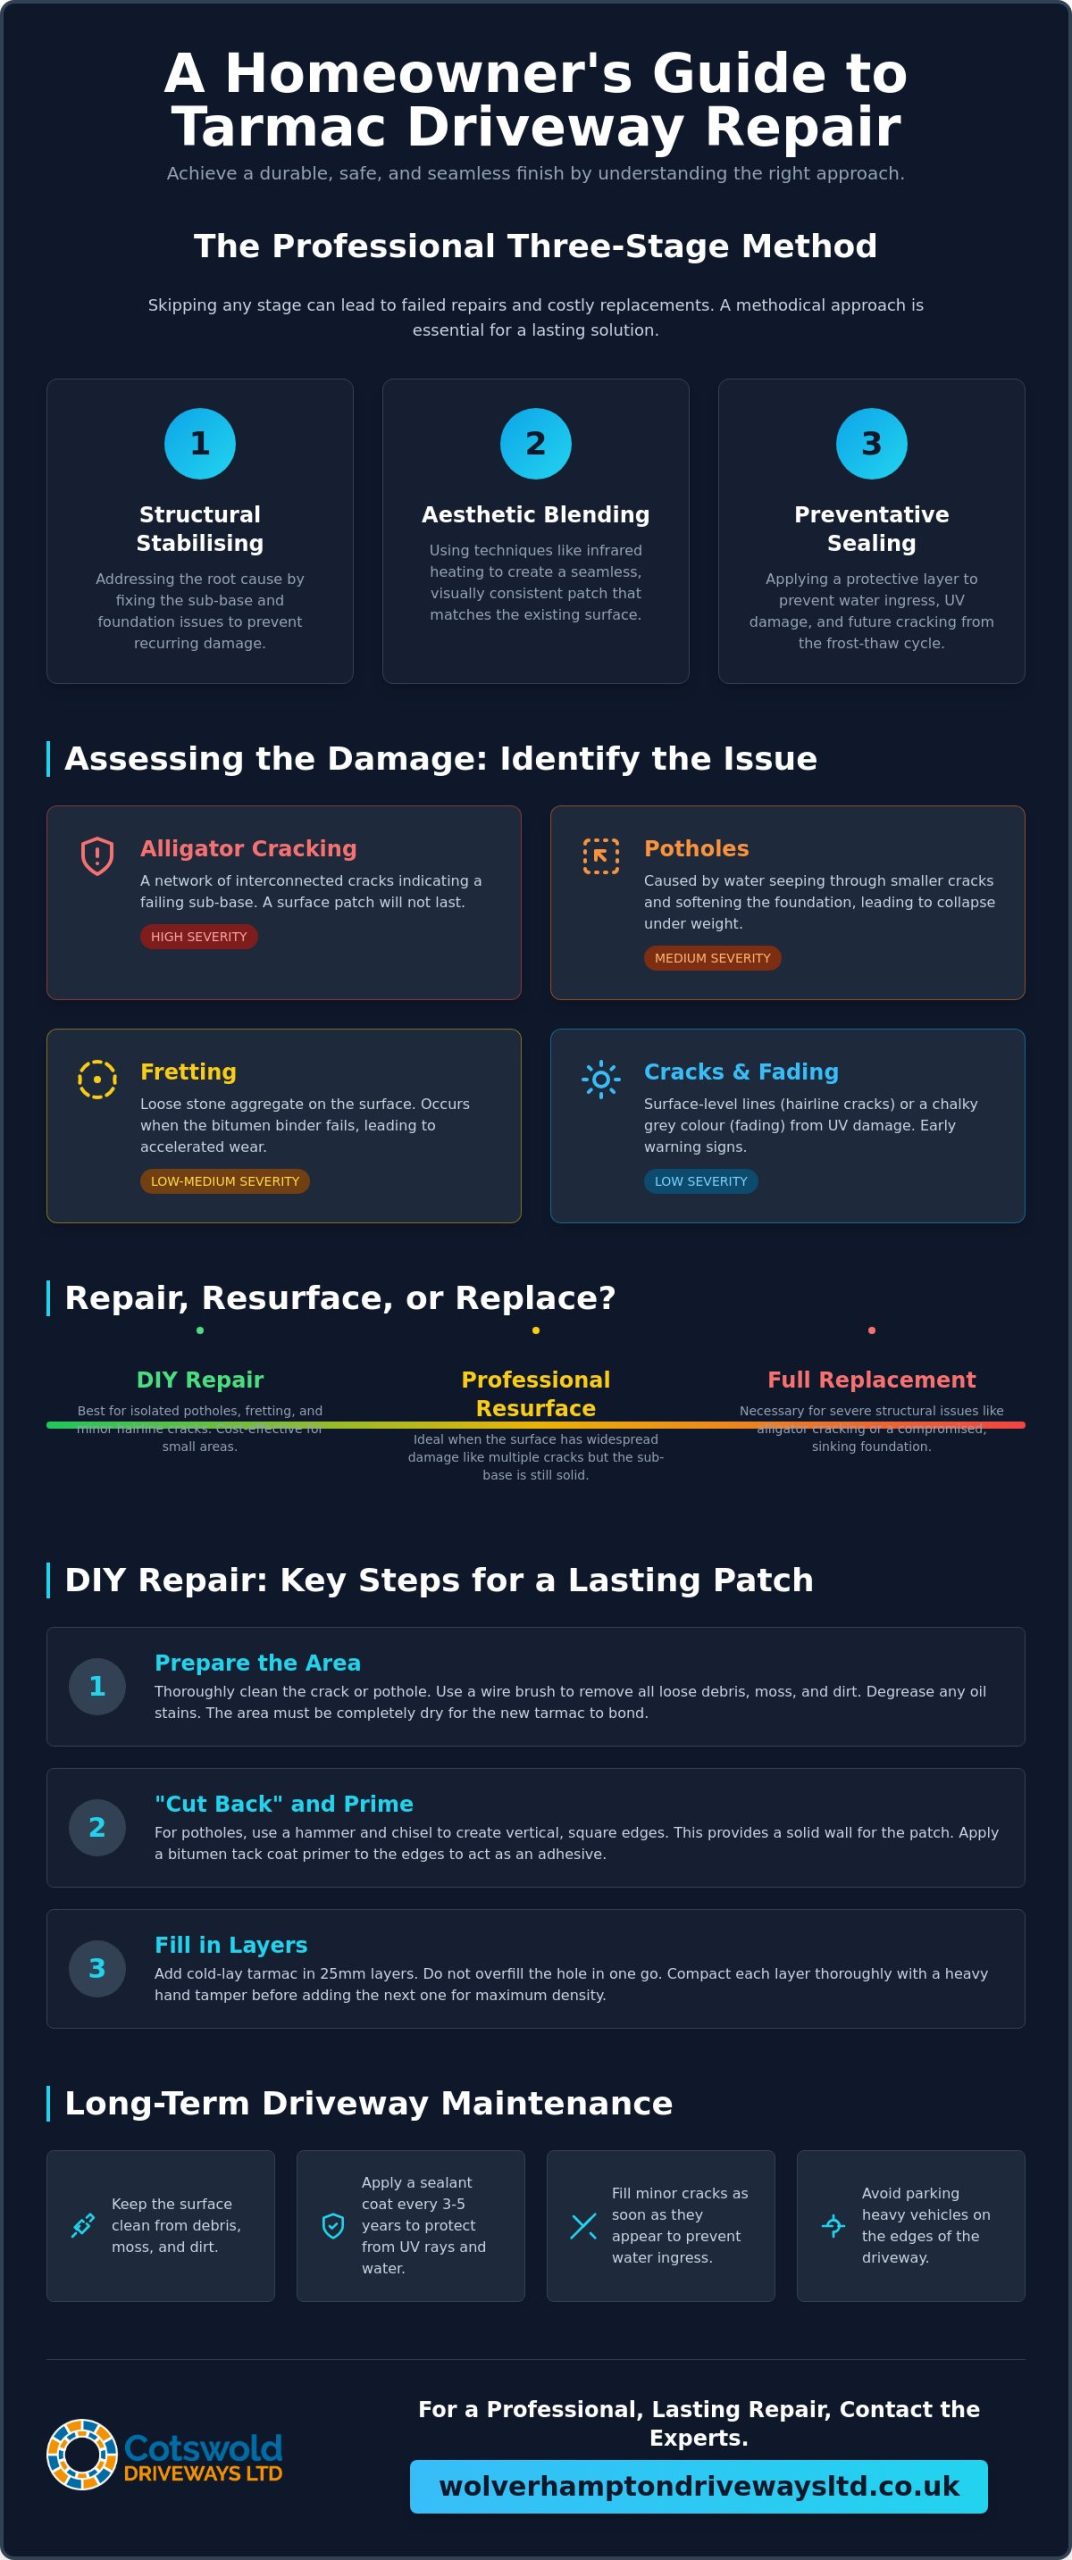
Most homeowners think a few bags of cold-lay tarmac and a bit of elbow grease are enough to fix a crumbling drive; however, skipping just one step in the restoration process usually means your repair will fail before the next winter frost hits. Effective tarmac driveway repairs require a methodical three-stage approach of structural stabilising, aesthetic blending, and preventative sealing. If you miss any of these stages, you’re likely just delaying an inevitable and expensive full replacement.
We understand that seeing weeds sprout through cracks or watching a small hole turn into a tripping hazard is incredibly frustrating. It’s not just about the safety of your family and visitors; it’s about protecting your property value and keeping your home’s kerb appeal high. You want a surface that looks consistent and stays level for years to come, rather than a patchy quick-fix that stands out for the wrong reasons.
This guide provides the expert knowledge you need to identify damage early and fix it properly to save you thousands of pounds. You’ll discover how to achieve a smooth, safe surface whilst learning the specific maintenance habits that prevent future frost damage. We’ll walk through the essential steps of assessment, repair, and long-term protection to ensure your driveway remains a durable asset to your home.
Key Takeaways
- Learn how to distinguish between minor hairline cracks and structural “alligator” patterns to ensure you choose the most effective restoration method.
- Follow our expert guide for small tarmac driveway repairs, including the vital “cutting back” technique that ensures your patch stays level and secure.
- Understand the “damage percentage” rule to help you decide when a simple patch is enough and when a full resurface is the smarter investment.
- Discover how professional infrared heating creates a seamless bond between old and new surfaces, providing a visual consistency that DIY kits can’t match.
- Implement a proactive maintenance and cleaning schedule to protect your sub-base from water ingress and prevent future frost damage.
Assessing the Damage: Common Tarmac Driveway Issues
Before you reach for a repair kit, you need to know exactly what you’re looking at. Tarmac is a resilient material, but it isn’t invincible. Understanding the Asphalt Concrete Composition of your drive helps explain why certain issues appear over time. Most tarmac driveway repairs start with a simple visual inspection. You might spot thin, single lines known as hairline cracks. These are usually surface-level and easy to manage if caught early. However, if you see a network of interconnected cracks that looks like the skin of a reptile, you’ve found “alligator cracking.” This is a sign of deeper trouble; it suggests the foundation beneath the tarmac is moving or failing, meaning a surface patch won’t last long.
Potholes are the next stage of neglect. They usually form when water gets into those small cracks and reaches the sub-base. Once the foundation softens, the weight of your car forces the tarmac to collapse. You might also notice “fretting,” where the top layer of stone aggregate starts to come loose and roll around like marbles. This happens when the binder holding the stones together begins to fail. If you don’t address these loose stones, they’ll act like sandpaper, grinding away the rest of your driveway every time you drive over them.
Why West Midlands Driveways Suffer in Winter
Homeowners in towns like Wolverhampton and Dudley deal with a specific set of challenges. Our local frost-thaw cycle is particularly brutal on driveways. When temperatures drop, water trapped inside cracks freezes and expands. This physical pressure forces the cracks wider every single night. Standing water is another silent killer. If your driveway doesn’t drain properly, the constant moisture weakens the bond between the bitumen and the stone. Even the salt and grit you use to keep your paths safe in January can accelerate the breakdown of the surface if it’s already showing signs of wear.
Surface Fading and Resin Loss
A healthy tarmac drive is deep black and slightly flexible. Over time, you’ll notice it turning a dull, chalky grey. This isn’t just an aesthetic problem. UV radiation from the sun causes oxidation, which chemically breaks down the bitumen binder. As the resin disappears, the surface becomes brittle and loses its ability to flex under the weight of a vehicle. If your drive has lost its colour, it’s a clear signal that the material is drying out and becoming prone to snapping rather than bending. Catching these signs early makes future tarmac driveway repairs much simpler and far more cost-effective. If you’re considering a full restoration and want to explore contemporary colour options, our guide to modern grey tarmac driveways covers the latest finishes that can transform a tired surface into a stylish entrance.
DIY Tarmac Repairs: A Step-by-Step Guide for Small Fixes
If you’ve spotted minor damage early, you can often handle the fix yourself. Taking the time to do it properly prevents a small issue from becoming a structural failure. To get started, you’ll need a few specific tools: a stiff wire brush, a blow torch or heat gun, and a heavy hand tamper. Whilst liquid crack fillers are excellent for narrow gaps, cold-lay macadam is the standard choice for actual potholes. For those who prefer a professional finish without the DIY stress, our team provides expert driveway repairs that ensure long-lasting results.
Step 1: Preparing the Repair Zone
Preparation is the most important part of the job. You must remove every trace of moss, loose stones, and debris from the damaged area. A wire brush is perfect for scrubbing the edges until you reach solid material. If there are oil stains from a parked car, use a dedicated degreaser to clean the surface. New bitumen won’t bond to oil; it will simply slide off. Finally, ensure the area is bone dry. If the British weather isn’t cooperating, use a blow torch to evaporate any moisture trapped in the pores of the tarmac. Working on a damp surface is a guaranteed way to make your tarmac driveway repairs fail within weeks.
Step 2: Filling and Compacting
Before you add any new material, you must “cut back” the pothole. Use a hammer and chisel to create vertical, square edges rather than rounded ones. This gives the new tarmac a solid wall to press against. Apply a bitumen-based tack coat or primer to these edges to act as an adhesive. When filling the hole, follow these steps:
- Layering: Pour the cold-lay tarmac in 25mm increments. Don’t try to fill a deep hole all at once or it won’t compact properly.
- Tamping: Use your tamper to strike the material firmly after each layer. You want to drive out the air and lock the stones together.
- The Overfill Rule: Leave the final layer sitting about 10mm to 15mm “proud” (higher) than the surrounding driveway.
- Final Compaction: Once you tamp the final layer down, it should sit perfectly flush with the old surface.
Always wear heavy-duty gloves and eye protection when working with these compounds. Bitumen is difficult to remove from skin and can cause irritation. If the damage covers more than a small area, or if the sub-base feels soft when you’re tamping, it’s usually a sign that the driveway needs professional attention rather than a DIY patch. Knowing how to identify and vet reliable tarmac companies near me before you commit to a contractor can save you from costly mistakes and poor workmanship.
Repair vs. Resurface vs. Replace: Making the Right Investment
Deciding whether to patch a pothole or dig up the entire drive is a common dilemma for homeowners. You want a solution that lasts, but you don’t want to pay for a full replacement if the existing surface still has life in it. The key is to look at the overall condition rather than just the visible holes. When tarmac driveway repairs start to cover a large portion of your drive, you’ve reached a tipping point where the cost of individual fixes will soon outweigh the price of a more permanent solution.
The “30% Rule” for Driveway Restoration
Professional installers often apply the “30% rule” when assessing a site. If more than 30% of the surface is covered in cracks, patches, or potholes, the tarmac is likely past its useful life. Bitumen loses its flexibility as it ages, becoming brittle and prone to shattering. If your driveway is over twenty years old and shows widespread “alligator” cracking, surface repairs are merely a temporary sticking plaster. You should also check for “sinking” areas. If the ground is dipping where you park your car, the sub-base has failed. Patching over a hollow foundation is futile; the new tarmac will simply sink into the same hole within a few months. In these cases, a structural fix is the only way to ensure peace of mind.
Resurfacing: The Middle Ground Solution
Resurfacing is an excellent option if your foundation is still solid but the surface looks tired and worn. This process involves adding a fresh 25mm to 35mm layer of hot-lay tarmac directly over the existing drive. It’s a faster, cleaner, and more affordable alternative to a full “rip-out and replace” job. An overlay provides a perfectly uniform black finish, removing the “patchwork quilt” look whilst instantly improving your property’s value. Many homeowners also use this opportunity to upgrade to grey tarmac driveways, which offer a contemporary charcoal or mid-grey aesthetic that complements modern rendered facades beautifully. During this process, we always pay close attention to drainage. Because resurfacing raises the height of the drive, we must ensure the new level doesn’t sit above your damp proof course or cause water to pool against your walls. A professionally resurfaced driveway can look and perform like a new installation for many years, making it a highly sensible investment for most homeowners.
Professional Tarmac Restoration: Beyond the Quick Fix
While a DIY patch is a great way to stop a small hole from growing, professional tarmac driveway repairs offer a level of durability and visual consistency that bagged products simply cannot match. The biggest difference lies in the temperature of the material. Professionals use hot-lay tarmac, which is transported in insulated lorries to keep it at the ideal working temperature. This heat allows the bitumen to remain flexible during the installation, ensuring every stone is fully coated and bonded to its neighbour.
One of the most impressive tools in a master-craftsman’s arsenal is the infrared heater. Instead of just pouring new material into a cold hole, we use infrared technology to heat the surrounding old tarmac until it reaches a workable state. We then add new hot-lay material and rake them together. This process effectively “welds” the old and new surfaces into a single, monolithic layer. It eliminates the “cold joint” where water usually enters, making the repair virtually invisible and much harder for frost to penetrate.
The Hot-Lay Advantage
Hot-lay tarmac is significantly more resilient than cold-lay alternatives because it undergoes professional compaction. We don’t just use a hand tamper; we use heavy vibratory rollers that apply tonnes of pressure. This forces the aggregate to lock together tightly, removing air pockets that lead to future sinking. The result is a seamless transition between the repaired area and the rest of your drive. You won’t have to worry about a bumpy ride or a patch that looks like an afterthought. These techniques ensure your driveway can handle the weight of modern vehicles without cracking under the pressure.
Restoring Colour and Protection
Once the structural repairs are complete, we focus on the lifespan of the entire surface. High-pressure cleaning removes deep-seated moss and dirt that hold moisture against the bitumen. We then apply industrial-grade sealants that are rich in bitumen and resins. These restorers replenish the oils lost to years of UV exposure, making the tarmac flexible again. By utilising industrial-grade restorers and meticulous application techniques, Wolverhampton Driveways Ltd ensures a uniform, deep-black finish that looks indistinguishable from a brand-new installation. This protective layer also acts as a barrier against petrol and oil spills, which would otherwise dissolve the binder and cause the surface to crumble. If you want to restore your home’s kerb appeal with a finish that lasts, speak to our team about professional driveway repairs to get your project started.
Maintaining Your Restored Driveway: Preventing Future Cracks
Once your project is finished, the real work of preservation begins. Even the most expert tarmac driveway repairs need a little help to survive the long term. You should ideally inspect your driveway every six months; catching a tiny hairline crack now is far easier than filling a pothole in a year. Be particularly careful with “scuffing” during the first few months after a repair. Modern cars are heavy, and turning your steering wheel whilst the vehicle is stationary can tear the surface of fresh tarmac, especially on a warm afternoon. Always try to be moving slightly when you turn the wheels to keep the surface intact.
Managing the edges of your drive is equally important. Weeds and grass are surprisingly powerful; their roots can act like tiny drills, forcing their way under the tarmac and lifting the edges. Keep your lawn borders tidy and treat any emerging growth with a suitable weedkiller immediately. If you notice the surface starting to look “dry” or grey again, it’s time to re-apply a protective sealant. Generally, a high-quality sealant every three to five years will keep the bitumen flexible and the colour deep black. Taking these small steps ensures your tarmac driveway repairs provide the maximum return on your investment.
Routine Cleaning and Care
Keeping your driveway clean does more than just improve kerb appeal. You should sweep away grit and leaves regularly, as organic matter holds moisture against the surface. If you use a pressure washer, proceed with caution. Use a wide fan tip rather than a narrow pinpoint jet, and keep the nozzle at least 30cm away from the surface. A jet that’s too powerful can dislodge the stone aggregate. Avoid using harsh household bleach or industrial chemicals, as these can dissolve the bitumen binder. For oil spills, act fast; soak up the liquid with cat litter or sawdust and use a mild detergent to lift the stain before it softens the tarmac.
Seasonal Protection Tips
Winter is the hardest season for any driveway. Before the first frost arrives, walk the length of your drive and seal any visible cracks to prevent water from entering. This simple task stops the frost-thaw cycle from doing its worst. You should also check that your gutters aren’t overflowing onto the drive and ensure any aco-drains or soakaways are clear of silt. Proper drainage is your best defence against structural failure. Ready for a professional assessment? Contact our Wolverhampton team for a free quote and we’ll help you keep your driveway in top condition.
Take the Next Step Toward a Perfect Driveway
Repairing your driveway isn’t just about filling a hole; it’s about protecting the structural integrity and value of your property. By identifying alligator cracks early and understanding when to resurface rather than patch, you’ll save thousands of pounds in future replacement costs. Whether you tackle minor fixes yourself or choose professional tarmac driveway repairs for a seamless, durable result, the goal is a safe and smooth entrance that stands up to the elements.
Our team of fully insured and licensed contractors are local experts serving homeowners across Wolverhampton and the West Midlands. We specialise in both deep structural repairs and high-end aesthetic restoration to give you total peace of mind. Book your free tarmac driveway repair quote today and let’s discuss the best way to restore your drive. You don’t have to settle for a crumbling surface when a reliable, professional finish is just a phone call away.
Frequently Asked Questions
Can I repair a tarmac driveway myself?
You can certainly handle minor tarmac driveway repairs yourself if the damage is limited to surface cracks or small holes. DIY kits containing cold-lay macadam and crack fillers are widely available at local builders’ merchants and are perfect for quick fixes. However, these are often temporary solutions that lack the durability of professional hot-lay applications. If you notice structural sinking or widespread “alligator” cracking, a professional assessment is necessary to prevent the damage from spreading further.
How much does it cost to repair a tarmac driveway in the West Midlands?
The cost of professional repairs depends on several factors, including the surface area, the depth of the damage, and the specific repair method required. A simple patch repair is naturally more affordable than a full resurface of the entire drive. Because every project in the West Midlands has unique drainage and foundation requirements, we recommend getting a site-specific quote. This ensures you get an accurate price that reflects the actual work needed for your property.
How long do tarmac repairs typically last?
A professional hot-lay repair can last for many years, often matching the remaining lifespan of the original driveway surface. In contrast, DIY cold-lay patches are typically considered a medium-term solution and may require attention again after two or three winters. The longevity of any repair depends heavily on how well the edges were prepared and whether the material was properly compacted to exclude water ingress. Professional “welding” techniques offer the best durability.
What is the best time of year to carry out tarmac repairs?
The ideal time for these repairs is during the warmer months between April and September. Tarmac requires dry conditions and ambient warmth to bond effectively and remain workable during the compaction process. Whilst emergency repairs can be done in winter, the presence of ground moisture and freezing temperatures significantly increases the risk of the patch failing prematurely. Planning your maintenance for the summer months helps ensure a seamless and long-lasting bond.
Why is my tarmac driveway cracking so soon after installation?
Early cracking usually indicates a failure in the sub-base or a layer of tarmac that was laid too thin for the weight of your vehicles. If the foundation wasn’t compacted correctly during the initial installation, it will shift and settle over time. This movement forces the surface to stretch and eventually snap. In some cases, it can also be caused by “scuffing” from heavy power steering movements whilst the vehicle is stationary on a very hot day.
Can you put new tarmac over old tarmac?
You can put new tarmac over old tarmac, a process known as resurfacing or an “overlay.” This is a cost-effective way to restore your drive without the mess and expense of a full excavation. It is only recommended if the underlying foundation is still structurally sound and free from major sinking issues. We also need to ensure that the increased height of the drive doesn’t interfere with your home’s damp proof course or existing drainage channels.
How long should I wait to drive on a repaired tarmac patch?
You should ideally wait at least 24 hours before driving a vehicle over a fresh cold-lay repair. If a professional has used hot-lay tarmac, the surface is usually ready as soon as it has completely cooled, which often takes just a few hours. During particularly hot weather, the bitumen stays soft for longer. It is wise to avoid tight steering manoeuvres on the new patch for several days to prevent surface marks and scuffs.
Does sealing a tarmac driveway actually prevent potholes?
Sealing your driveway is one of the most effective ways to prevent potholes from forming in the first place. Potholes are almost always caused by water getting into small cracks and weakening the sub-base foundation. A high-quality sealant acts as a waterproof barrier, keeping moisture out and replenishing the oils that keep tarmac flexible. Regular sealing every few years significantly extends the time between major tarmac driveway repairs and keeps the surface looking fresh.